
Top 10 Tips for DIY Residential Fencing Projects Around Albury
Building a DIY residential fence project involves more than putting up wood, steel or vinyl panels. Getting it right means considering privacy, durability, cost, safety, aesthetics and regulations.
Planning a new fence can boost curb appeal, block prying eyes, or reduce noise. Taking on a residential fencing project yourself in Canberra can be very rewarding, especially when you choose the best type of fencing for homes that balances privacy, durability, and design.
This guide shares the top 10 tips for building a DIY fence. It includes planning the layout, setting posts, and adding finishing touches. Regular maintenance is also covered.
You'll learn how local ACT rules impact fence height. You'll also see which materials work best for Canberra's weather.
Plus, find tools and tips that save you time during installation, no matter your DIY experience.
1. Confirm Property Boundaries and Your DIY Residential Fence Project Line

Before buying materials or digging holes, mark your property line and establish a straight line for your fence.
Your boundary fence should align with property boundaries accurately to avoid neighbour disputes.
Check title documents, survey plans, or covenants. Use pegs, string and levels to visualise fence layout on the ground.
Neighbour communication proves especially important. ACT's Common Boundaries says if it's a shared boundary fence, neighbours should agree on style, height, cost and maintenance. When agreement proves difficult, mediation remains available.
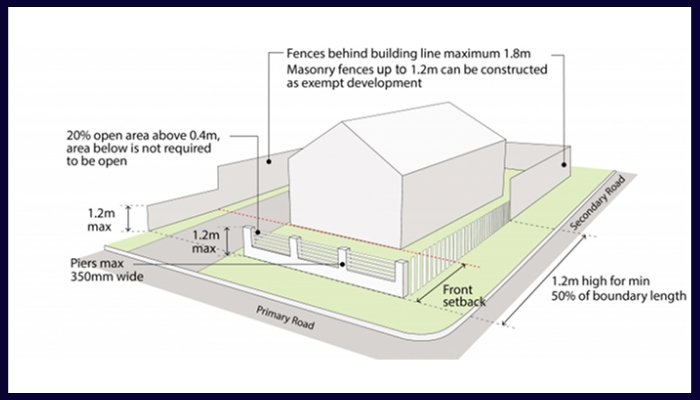
2. Check Rules on Fence Height, Setbacks and Council Approval

Understanding what your local government office permits is essential.
Fences between houses (side or rear boundary fences) generally reach up to 2.3 metres high without development approval.
Front fences, or boundary fences facing streets, usually can't be freestanding if they're in front of the building line. Front fences over roughly 40cm are banned in many residential areas unless you secure approval. Hedges may be exempt.
Corner blocks may have easier rules for clear or low-maintenance fences. There are height limits, usually about 1.5m, and designs should reduce visual impact.
Check the Residential Boundary Fences General Code section of ACT Planning & Development Regulation.
Before building, confirm if your proposed wooden fence or metal fences are development exempt. If not, you'll need to lodge a development application with your local council.
3. Plan the Fence Layout to Save Time and Materials
Careful planning of your fencing layout helps avoid waste. It also ensures you buy the right amount of materials.
First, sketch your DIY fence layout including gates, corners, slopes, and ground changes. Measure carefully: determine fencing materials, posts, rails, panels or palings needed.
Double check measurements. Match panel widths or rail spacing to minimise cuts; this saves materials and time.
Do you have a sloping ground? Decide if you want to step your wooden fence with flat panels at different heights or install raked panels that follow the slope. Stepped fences suit DIY beginners better.
Gate positions prove vital: gates should be wide enough, swing clear, with sufficient hardware clearance.
Good layout prevents costly mistakes and reduces expensive returns or extra purchases.
4. Call Before You Dig: Utilities, Ground and Frost Line
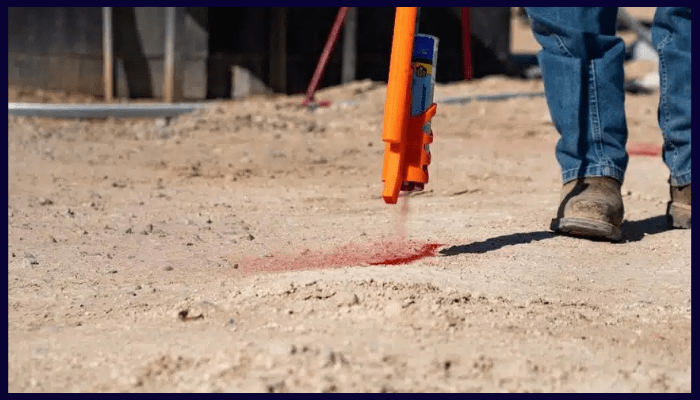
Check ground conditions and underground infrastructure before digging fence posts. Not doing so can be dangerous and expensive.
Use "Before You Dig Australia" service to locate underground utility lines like water, gas or cables. Assess soil type: clay, rock, sand. Canberra has clay areas and sometimes frost. This affects how deep the footing needs to be and if drainage is required at post bases.
Ground drainage matters. Ensure your design doesn't divert surface water onto neighbours' property or cause ponding. ACT rules require fences mustn't adversely impact surface water flow.
5. Choose the Right Materials for Less Maintenance and Long Term Durability
Your material choice shapes aesthetic appeal, longevity, cost and regular maintenance of your new fence.
| Material | Pros | Cons | Best Use in Canberra |
|---|---|---|---|
| Timber fences (pressure-treated or hardwood) | Natural aesthetic, cost-effective, easy to cut and adjust. | Needs painting/staining, vulnerable to rot, termites, warping. | Backyard or side boundaries; if you accept regular maintenance. |
| Colorbond® steel or metal fences | Very low maintenance, weather resistant, good privacy, termite resistant. | Higher initial cost, warmer to touch in summer, panel install can be complex. | Excellent for side/rear outdoor space; blocks noise and prying eyes. |
| Vinyl fencing / PVC | Lightweight, little maintenance, won’t rot or rust. | Upfront cost, limited styles; UV brittleness possible if poor quality. | Decorative front fencing or low-maintenance boundary sections. |
| Aluminium / slat fences | Corrosion resistant, modern style; semi-private options possible. | Less full privacy, often more expensive than timber; careful install needed. | Decorative or semi-private fences, accent boundaries, gates. |
| Chain link fence / wire mesh | Most affordable, quick install, utilitarian. | No privacy, lower kerb appeal; not ideal for street-visible frontages. | Side yard, pet enclosures, utility areas. |
Consider your fixings (nails, screws, brackets. Galvanised or stainless steel resist rust in Canberra's weather conditions.
Use treated timber or posts on stirrups preventing rot at ground interface. Check warranties for materials, and explore fencing designs for noise control with good brands that offer decades of lifespan, particularly for Colorbond or metal panels.
6. Tools and Setup for a Smooth DIY Project
Good tools and a safe setup are key when building privacy fences, boundary fences, or decorative garden fences.
Essentials:
Tape measure
Spirit level.
Post hole digger or auger.
Hammer or nail gun.
Saws:
Circular saw or hand saw for wood fence.
Metal cut saw or angle grinder for steel.
Drill/impact driver.
Consumables:
Concrete or post mix
Gravel base for drainage.
Quality fixings: galvanized screws/nails.
Brackets, latches, and hinges for gates.
Safety gear: eye protection, gloves, hearing protection for power tools, sturdy boots.
Setup: create cutting station, organise materials near fence line, have helpers for heavy panels or long rails.Plan work in phases: setting posts first, letting concrete cure, then adding rails, panels or palings.
Use jigs or spacers for consistent gaps and level panels.
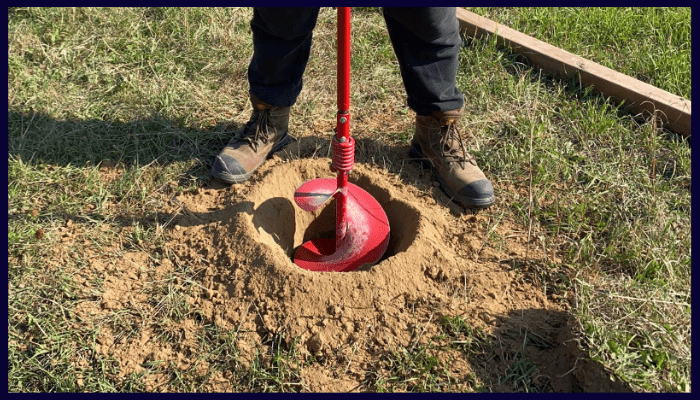
7. Set Strong Fence Posts and Foundations

The longevity and strength of your DIY fence depends heavily on fence posts and foundations.
Post hole depth: For standard 1.8m high fencing, posts should go at least 600mm underground. This is about one third of the above-ground height in firm soil. Dig deeper and wider holes if soil proves sandy or rocky.
Gravel base at hole bottoms improves drainage and reduces rot risk for wood fence posts and rust risk for metal.
Use post mix concrete; brace posts plumb until concrete cures. Don't install heavy rails or panels until at least 24 hours (or per product guidelines) after concrete sets.
Reinforce corner, gate, and end posts because they carry more weight. Sometimes, you may need larger posts. Adding braces or deeper footings can help too.
Getting post spacing right is key. Match the panel or paling width and add hardware allowance. This prevents wasted materials and makes installation look neat.
8. Install Rails, Panels and Infills the Right Way

Once posts are solid, focus on your fence body: rails, panels, palings, slats or infills.
For timber palings, use spacers or uniform jig ensuring gaps stay even; keep rails level throughout.
For panels or modular systems, buy pre made panels where possible; these save time on measuring, cutting and alignment.
Ensure hardware (brackets, screws, hinges) uses durable, rust resistant material. Where panels meet posts, allow clearance so wood can swell or contract.
If using decorative slats or horizontal boards, ensure consistent spacing and secure attachment. If parts of your wooden fence are raked or stepped, cut boards to shape carefully.
Paying attention to details keeps materials stable. This prevents rattling and warping. It also improves the alignment of the fence line.
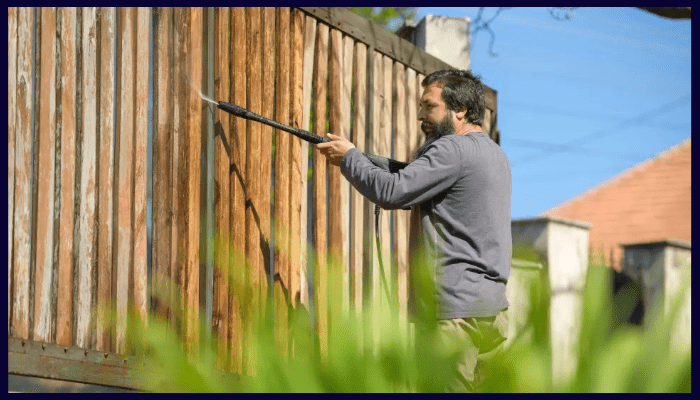
9. Finishing: Painting, Staining and Weather Protection

Finishing protects your investment and gives your new fence polished curb appeal.
Timber fences: seal or stain soon after finishing installation; use exterior paints or stains rated for UV exposure. Recoats may be needed every 2 to 5 years depending on weather conditions.
For metal fences or Colorbond, first wash off dirt. Then, check for scratches. If you find bare metal, touch it up with the right paint or protective coating.
Post caps help prevent water entering wooden posts; good drainage around post bases remains essential.
Choose materials and finishes with bushfire resistance in mind if you live in fire prone suburbs. Finishing touches, like capping rails and decorative tops, enhance beauty and durability.
10. Regular Maintenance to Protect Your Investment
Even low maintenance vinyl fencing benefits from occasional care to fence regularly.
Inspect fences annually or after storms. Check for loose boards, rusting screws, sagging gates or posts that aren't plumb.
Clean metal or Colorbond fences with hose or mild detergent; avoid harsh cleaners damaging finishes.
For wood fence maintenance, clean mildew or mould, restain or repaint when needed, replace any damaged or rotten palings.
Lubricate gate hardware periodically. Ensure hinges, latches remain aligned and secure so gates don't sag.
Regular maintenance helps prevent common residential fencing problems, such as sagging posts, rust, or rotting timber, which can lead to expensive repairs and increase your overall fencing cost. It also keeps privacy, security, and property boundaries intact.
Mini Buying Guide: Quick Picks by Goal
Here are fast recommendations for your DIY fence ideas depending on what you want:
| Goal | Best Material/Style | Considerations |
|---|---|---|
| Maximum privacy with low maintenance | Colorbond steel panels or vertical metal fences | Higher cost, ensure durability and correct installation |
| Least maintenance budget option | Vinyl fencing or composite panels | Check UV stabilised material, good warranties |
| Best value wood option | Pressure-treated wood paling fence | Requires painting/staining, termite protection needed |
| Decorative or heritage look | Timber picket or slat fencing, decorative gates | More labour, careful alignment, painting required |
Conclusion
A well built fence does more than define your house boundary: it adds security, privacy, noise reduction, and curb appeal.
Whether you’re weighing up Timber vs Colorbond or other materials, plan your layout carefully, choose quality fencing, and follow local ACT fence height rules.
Get council approval, install posts correctly, and keep up with regular maintenance. With these steps, your DIY project can last for decades.
Here are some tips for your fencing project:
Confirm your boundary.
Choose the right materials.
Buy quality tools.
Build sturdy posts.
Finish nicely.
Maintain regularly.
By keeping these fencing mistakes to avoid in mind, you’ll build a fence that not only looks great but also functions well and lasts for years.
Frequently Asked Questions
-
For side and rear fences, around 1.8 to 2.3 metres proves common. For front fences, height limits stay much lower (often about 40cm forward of the building line) unless you receive council approval.
-
If your fence meets ACT's exempt criteria (height, material, and location) you might not need a development application. Anything in front of the building line, non-transparent, or too tall probably needs local council approval.
-
Colorbond steel, aluminium, vinyl fencing and composite panels tend towards lowest maintenance. Timber and chain link require more upkeep (painting, staining, rust control).
-
Measure the total length of the fence line. Then, subtract the widths for gates. Count the number of panels or palings based on the panel width or board spacing. Also, include posts, rails, and fasteners. Always buy extra for damage or mistakes.
-
Yes, if you use pressure treated wood (H3 or H4), good fixings, allow drainage, seal or stain, inspect regularly. Untreated timber proves vulnerable to rot, warping and termite damage despite environmental factors. Best to use pressure treated wood for your DIY residential fencing projects.

Greg Hair, owner of Slide Living, has over a decade of experience in delivering high-quality landscaping and outdoor living solutions across Albury-Wodonga and surrounding regions.
Known for his attention to detail and great customer care, Greg has transformed hundreds of properties, specialising in everything from fencing, decking and home irrigation.
SLIDE Living is fully licensed and insured, ensuring top-notch workmanship and customer satisfaction on every project.